Hummer Hearth Setup and Use Instructions
The Hummer Hearth hummingbird feeder heater will fit hummingbird feeders with a ring-type perch and a bottom without protrusions so the product can be directly in contact with the bottom of the feeder. The Hummer Hearth creates a warm pocket of air that heats the bottom of the feeder. Do not use if the bulb is in contact with the feeder when attached.
Safety Tip – There must be clearance between the bulb and any surface on the feeder.
Initial Adjustment
The Hummer Hearth attaches to the hummingbird feeder with three hooks that engage the ring perch. These hooks are attached to shock cord. Adjust the shock cord by squeezing the cord lock and moving the cord lock along the shock cord. Do not install the lamp holder yet.
- For bowl-type feeders, remove the hanging hook; for bottle-type feeders, remove bottle.
- Turn the feeder over and place the Hummer Hearth on top of the feeder.
- Connect the hooks to the ring perch and use the cord lock to adjust the tension of the shock cords.
- Adjust the tension on each hook by removing slack or tension as needed until all three hooks have about the same tension and are evenly spaced. When correctly adjusted, this step is not required every time you fill the feeder. See figure 1.
Pro Tip – It is best to have just enough tension to hold the Hummer Hearth against the bottom of the feeder.

Figure 1
Filling Bowl-Type Hummingbird Feeders
- With the lamp holder removed, place the Hummer Hearth upright on a flat surface, then place the bowl feeder on top of the Hummer Hearth.
- Fill the feeder. See figure 2.
- Replace the feeder top.
- Now, holding the feeder down against the Hummer Hearth with one hand, attach the hooks to the ring perch with the other hand. See figure 3.
- Adjust for even tension and spacing between hooks.
- Attach the ant moat cover. See figure 4.

Figure 2

Figure 3

Figure 4
Filling Bottle-Type Hummingbird Feeders
- With the lamp holder removed, place the Hummer Hearth on a flat surface, then place the feeder bottom on top of the Hummer Hearth.
- Now, holding the feeder down against the Hummer Hearth with one hand, attach the hooks to the ring perch with the other hand. See figure 5.
- Adjust for even tension and spacing between hooks.
- Fill the bottle, then screw the base with the Hummer Hearth attached to the filled bottle. See figure 6.

Figure 5

Figure 6
Figure 5
Figure 6
Hang Your Hummingbird Feeder
- Hang the feeder with the Hummer Hearth hummingbird feeder heater attached as normal.
- Remove the packing material from the lamp holder.
- Safety Step – double check that the lamp holder is not plugged into power.
- Squeeze the two metal tabs on the lamp holder together and insert the lamp holder into the round hole in the base of the Hummer Hearth until the metal tabs snap in place. See figure 7.
- Release the metal tabs and check that the lamp holder is firmly attached to the Hummer Hearth.
- Plug the lamp holder cord into a GFCI outlet. (See safety instructions.)
- Verify that the bulb is working.

Figure 7
Removing the Feeder for Filling
- Unplug the lamp holder cord: squeeze metal tabs on the lamp holder together, then remove it from the Hummer Hearth.
- Follow the filling instructions in reverse order to prepare for refilling.
Pro Tips for Use
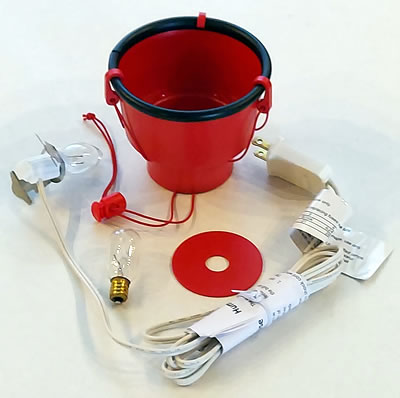
The Hummer Hearth includes a 7-watt candelabra C7 bulb (often referred to as a nightlight bulb) as a heat source and a spare 15-watt T7 bulb (often referred to as an appliance or wax warmer bulb) for cold weather. See FAQ page for details. The goal is to heat the feed gently without overheating. Generally, a 7-watt bulb will keep a small feeder thawed to about 20 degrees F. Feeder size, shape, and wind conditions can affect this significantly. A 15-watt bulb, also included, will keep smaller feeders thawed to about 10 degrees F.
Get a Hummer Hearth hummingbird feeder warmer for yourself or as a gift.