The Hummer Hearth hummingbird feeder heater took two decades of tinkering and experimenting to develop into an effective, safe, and easy-to-use device to keep feeders thawed. I’ve tried all but one of the six DIY methods listed here. They all work, though each has downsides.
Selecting the best method for you comes down to commitment. The Hummer Hearth makes that commitment convenient and safe.
Here are six do-it-yourself (DIY) methods people use to try to prevent their hummingbird feeders from freezing.
Method 1: Take Feeders Out in the Morning, Rotate Them During the Day, and Bring them In at Night
Rotating hummingbird feeders is the classic method and requires unwavering commitment. The hummers can only make it through a freezing night by going into a coma-like state called a topor. During the topor, the bird essentially shuts down to save the energy it needs to make it through a long freezing night and fly the next morning. When it’s light enough to fly, they will be at your feeder, and they need to eat. Set an early alarm. I read that they are often one meal away from death on these cold mornings.

Pre-dawn hungry hummer at a feeder
And don’t forget the last feeding at night is just as important as the first feeding in the morning.
Downsides: inconvenient, time intensive, and you need several feeders.
Method 2: Heat Lamps

Heat lamp pointed at a hummingbird feeder to prevent frozen nectar.
The first challenge when using a heat lamp is how to attach it so that the lamp is near the feeder. The next problem is the heat – heat lamps are called heat lamps for a reason. It’s the watts, heat energy. A Hummer Hearth produces 7 watts of heat. Heat lamps start around 150 watts – quite a bit more heat than is needed. The heat is no problem if you figure out how far to get the heat lamp away from the feeder. Too close, and the perch is too hot for them to land, or the nectar is too hot to drink. Too far, and your nectar will freeze. I suggest starting around 15 – 20 inches with a 150-watt heat lamp bulb. A higher wattage bulb means more distance is required. Feel the perch after a while. It is okay if the perch is a bit warm, otherwise move the heat lamp further away. Another sign that things are too hot is if the hummer only goes to the opposite side of the feeder from the lamp. Also, aim the heat lamp at the bottom of the feeder. It doesn’t matter if the nectar in a bottle is frozen, it is the area that they drink from that needs to stay thawed. Remember, your goal is to heat the hummer’s food, not the hummer (another topic). The best setup is to position the heat lamp to shine on the bottom of the feeder from below. Shining the lamp on the top of the feeder is the least effective method. Of course, things change as temperatures changes, so occasional adjustments are in order.
Downsides: electrical costs, risks of electrical shock, and fire hazards
Energy Cost
Power is relatively cheap in the Pacific Northwest. A Hummer Hearth costs about one penny to operate for 24 hours. A 150-watt heat lamp costs about $0.25 per day or $7.50 per month. In my experience, the bulbs typically last two seasons, so factor in the cost of heat lamp bulbs, too.
Electrical Shock
A metal heat lamp fixture intended to keep critters warm inside is unsafe for outdoor conditions. For safety reasons, we do not recommend using heat lamps to keep your hummingbird nectar from freezing. If you choose to use this method, at the very least, keep the fixture under some type of cover and plug the heat lamp into a GFCI-protected outlet.
Fire Risk
Heat lamps continue to burn down many homes and barns. If you are using one, be sure it is away from combustibles and secure it so that it will not blow off and fall against a wall or drop into dried leaves. For safety reasons, we do not recommend using heat lamps to thaw hummingbird nectar.
Method 3: Holiday Lights

Hummingbird feeder wrapped in holiday lights to warm nectar.
Old-school holiday light strings with incandescent light bulbs are a good heat source. Newer LED lights will not work; they do not put out enough heat. I haven’t tried this, but my friends have placed them in a tin pan just below the feeder. This will undoubtedly work down to some temperature. It will work best if the bulbs are close to the feeder and maybe right up against it. If you wrap the lights around the feeder, try to get the lights around the bottom of the feeder, where the hummers drink. A big advantage of holiday lights over heat lamps is outdoor holiday lights are designed for outdoor wet conditions, so any electrical hazard is significantly reduced. If you use a pan to hold the lights make sure there is a hole in the bottom to drain any water, or the lights could become submerged. I have not tested this approach, but in calm/still air, it should work well to moderate temperatures.
Downsides: time/hassle to remove and re-apply every time you change the nectar, and unreliable at lower temperatures
Method 4: Insulate the Feeder

Hummingbird feeder insulated with a sock to prevent frozen nectar.
Placing a sock around a feeder or insulating it will delay the time it takes for the feeder to freeze. The issue is there is no source of heat other than the warm nectar. The sock will help keep the heat in but only for so long. So your feeder will freeze at 11 o’clock instead of 10 o’clock at night. It helps if you rotate feeders during the day, but insulation will not prevent feeders from freezing overnight. To add insult to injury, if the temperatures rise above freezing during the day, the sock will keep that heat from getting into the feeder. There is no free lunch. If it’s below freezing, you have to add heat to keep the nectar thawed.
Downsides: does not prevent freezing at lower temperatures
Method 5: Heat Tapes and Heating Cables

Hummingbird feeder wrapped in heat tape to thaw the nectar.
Heat tapes are the go-to method for keeping water pipes from freezing. They are rated for outdoor wet conditions. Most put out about 5 to 7 watts of heat per foot. So a three-foot heat tape runs 15 to 21 watts of heat. This is a bit on the high side but workable. If you go this route, only wrap a couple of feet of the tape around the feeder and let the rest hang. It is essential to read the instructions that come with the heat tape. Those instructions warn against crossing the cable over itself, as this can produce a fire hazard. Feel the bottom of the feeder after a while. A bit warm is okay; otherwise, reduce the amount of tape against the feeder. The downside is coming up with a convenient way to attach the tape so that it isn’t a hassle to remove and re-apply when it’s time to clean and refill the feeder. Another issue is the heat tape is heavy, so it is hard to keep it from putting a tilt on the feeder when attached.
Downsides: may be inconvenient to remove and reapply for filling the feeder; potential fire hazards
Method 6: Heating Pads

Heating pad wrapped around a hummingbird feeder to thaw nectar.
Depending on the settings, heating pads put out about 20 to 60 watts of heat. Like the heat tape, more heat than needed but still workable. If you have one of the big tall hummingbird feeders, it is easy to wrap the whole thing, but with smaller feeders, heating pads are too big and awkward to attach to the feeder. Run the heating pad on its lowest setting. Be sure to check temperatures; heating pads can easily overheat things. As an electrical device, heating pads are unsafe in outdoor conditions.
Downsides: can easily overheat, unsafe in outdoor conditions
We applaud the ingenuity and dedication of every hummingbird enthusiast dedicated to keeping hummingbird nectar thawed during freezing conditions. Safety for you and your hummingbirds is paramount, whatever method you use.
Our Favorite Method for Keeping Hummingbird Feeders From Freezing
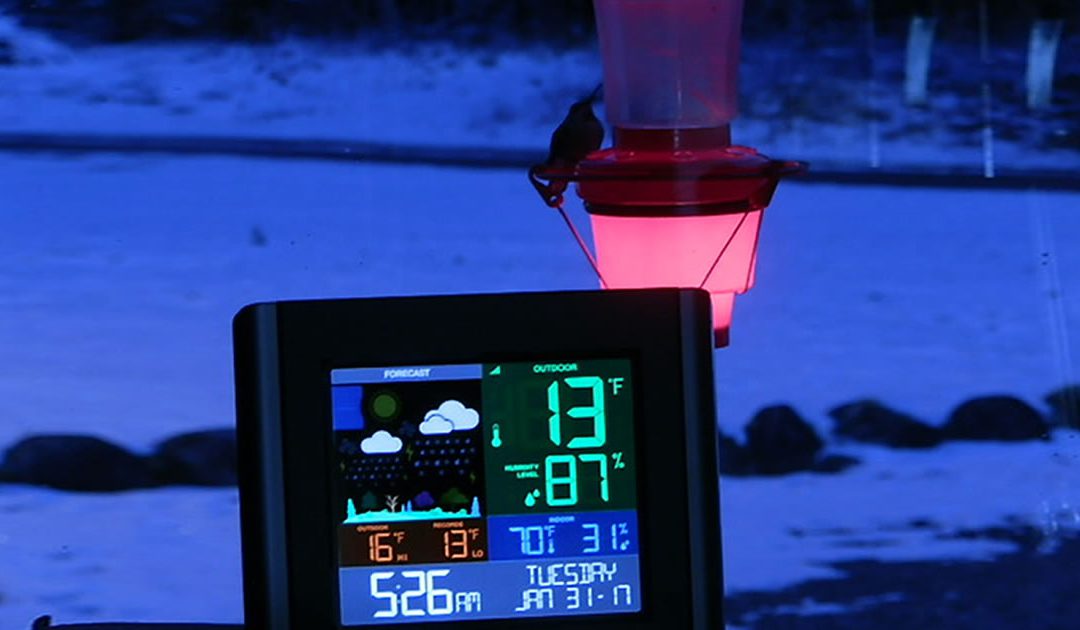
The Hummer Hearth hummingbird nectar warmer. It is safe, convenient, easy, and cost-effective. You can get more information about Hummer Hearth here and find a retailer here.
Three Bonus Tips for Caring for Hummingbird Feeders in Freezing Conditions
1. Monitor Your Hummingbird Feeder; Is it Too Hot or Too Cold?
A big part of DIY hummingbird feeder heating methods is knowing when the nectar is too hot or frozen so you can make adjustments.
- Test whether your feeder is too hot: feel parts of the feeder.
- Test whether your nectar is frozen: gently poke a toothpick down each feed hole to probe for ice. Gently poke all the holes, feeling for ice. This takes a bit of a touch, but it works. I suspect hummers have a hard time poking through the ice.
2. Protect from Wind
Whether you use a Hummer Hearth or another method to warm your hummingbird feeder, placement and protection are quite important. Wind is the biggest enemy because it removes heat rapidly. Any shelter from the wind will help your hummingbird nectar stay thawed.
3. Use a Feeder Cover
It is important to use a cover over your feeder. A cover will prevent snow and ice from covering the feeding area. You may be able to hang your feeder under an overhang, eve, or porch. And, there are many hummingbird feeder covers available at retailers. Most of our Hummer Hearth retailers carry hummingbird feeder covers.